OS RHEL9 에서 bonding 명령어로 설정, nmtui 사용하여 설정, 스크립트로 설정하는 법
페이지 정보
작성자 OSworker 아이디로 검색 전체게시물 댓글 0건 조회 1,559회 좋아요 1회 작성일 25-01-19 23:56본문
안녕하세요 오늘은 RHEL9에서 본딩 하는 방법을 알아보려합니다.
이전 글에서도 설명드렸듯이 RHEL9에서는 "/etc/sysconfig/network-scripts/" 을 사용하지 않기때문에
달라진 부분이 있는지 확인해보겠습니다.
- RHEL8 과 RHEL9과 달라진 부분은 bonding 설정 파일이 "/etc/sysconfig/network-scripts/" 밑에 존재하는것이 아니라,
/etc/NetworkManager/system-connections/ 에 존재하게 됩니다.
그럼 이제 설정을 하면서 좀 더 자세히 알아보겠습니다.
1. nmcli 명령어로 구성 하기
- 기존 RHEL8에서 사용하던 명령어와 거의 동일합니다.
- Bonding 인터페이스 생성 및 모드 설정
# nmcli connection add type bond ifname bond0 mode active-backup
- 슬레이브 인터페이스 추가
# nmcli connection add type ethernet ifname enp1s0 master bond0
# nmcli connection add type ethernet ifname enp7s0 master bond0
- IP 및 DNS 설정
# nmcli connection modify bond-bond0 ipv4.addresses 192.168.122.77/24 ipv4.gateway 192.168.122.1
- Bonding 인터페이스 활성화
# nmcli connection up bond-bond0
>Bonding 확인
[root@rhel9 ~]# ls -l /etc/NetworkManager/system-connections/
total 24
-rw------- 1 root root 275 Jan 19 21:22 bond-bond0.nmconnection
-rw------- 1 root root 198 Jan 19 21:15 bond-slave-enp1s0.nmconnection
-rw------- 1 root root 198 Jan 19 21:15 bond-slave-enp7s0.nmconnection
[root@rhel9 ~]# ifconfig
bond0: flags=5187<UP,BROADCAST,RUNNING,MASTER,MULTICAST> mtu 1500
inet 192.168.122.77 netmask 255.255.255.0 broadcast 192.168.122.255
inet6 fe80::f623:6e8b:d75b:3c2c prefixlen 64 scopeid 0x20<link>
ether 52:54:00:a6:f4:6a txqueuelen 1000 (Ethernet)
RX packets 816 bytes 60639 (59.2 KiB)
RX errors 0 dropped 388 overruns 0 frame 0
TX packets 355 bytes 44663 (43.6 KiB)
TX errors 0 dropped 0 overruns 0 carrier 0 collisions 0
enp1s0: flags=6211<UP,BROADCAST,RUNNING,SLAVE,MULTICAST> mtu 1500
ether 52:54:00:a6:f4:6a txqueuelen 1000 (Ethernet)
RX packets 631 bytes 48499 (47.3 KiB)
RX errors 0 dropped 40 overruns 0 frame 0
TX packets 354 bytes 44699 (43.6 KiB)
TX errors 0 dropped 0 overruns 0 carrier 0 collisions 0
enp7s0: flags=6211<UP,BROADCAST,RUNNING,SLAVE,MULTICAST> mtu 1500
ether 52:54:00:a6:f4:6a txqueuelen 1000 (Ethernet)
RX packets 299 bytes 20650 (20.1 KiB)
RX errors 0 dropped 237 overruns 0 frame 0
TX packets 4 bytes 310 (310.0 B)
TX errors 0 dropped 0 overruns 0 carrier 0 collisions 0
[root@rhel9 ~]# cat /proc/net/bonding/bond0
Ethernet Channel Bonding Driver: v5.14.0-427.13.1.el9_4.x86_64
Bonding Mode: fault-tolerance (active-backup)
Primary Slave: None
Currently Active Slave: enp1s0
MII Status: up
MII Polling Interval (ms): 100
Up Delay (ms): 0
Down Delay (ms): 0
Peer Notification Delay (ms): 0
Slave Interface: enp1s0
MII Status: up
Speed: Unknown
Duplex: Unknown
Link Failure Count: 0
Permanent HW addr: 52:54:00:a6:f4:6a
Slave queue ID: 0
Slave Interface: enp7s0
MII Status: up
Speed: Unknown
Duplex: Unknown
Link Failure Count: 0
Permanent HW addr: 52:54:00:d1:f9:73
Slave queue ID: 0
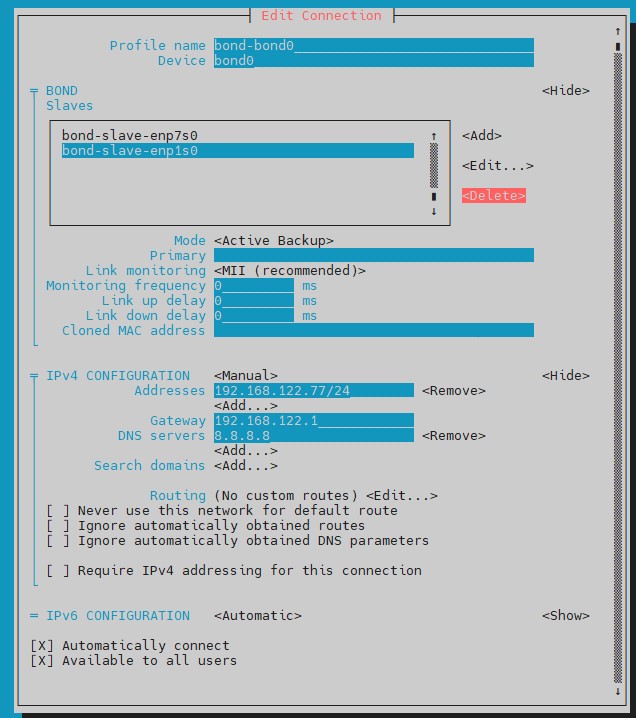
2. nmtui 로 본딩 설정 하기
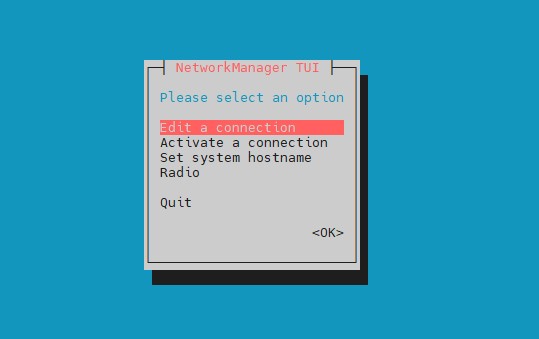
- nmtui 실행하기
# nmtui

1. 추가를 누릅니다.
2. 네트워크 유형 목록에서 Bond 를 선택하고 Enter 를 누릅니다.
3. 선택 사항: 생성할 NetworkManager 프로필의 이름을 입력합니다.
프로필이 여러 개인 호스트에서 의미 있는 이름을 사용하면 프로필의 용도를 쉽게 식별할 수 있습니다.
4. 장치 필드에 생성할 본딩 장치 이름을 입력합니다.
5. 생성할 본딩에 포트를 추가합니다.

참고링크 :
3. bonding 스크립트
- 제가 개인적으로 작업할때 사용하는 스크립트 공유드립니다.
[root@rhel9 ~]# cat bond0.sh
------------------------------------------
[root@rhel9 ~]# sh bond0.sh
Connection 'bond-bond0-1' (9753602f-e02d-44ca-9d8a-d7697b6f612d) successfully added.
Connection 'bond-slave-enp1s0-1' (1d7894d4-d5c2-42ac-9b3f-a23fcdcbb7dc) successfully added.
Connection 'bond-slave-enp7s0-1' (6fcfe9e5-f2ce-4aa6-a35c-af805891b293) successfully added.
Connection successfully activated (master waiting for slaves) (D-Bus active path: /org/freedesktop/NetworkManager/ActiveConnection/5)
댓글목록
등록된 댓글이 없습니다.


 Top
Top