OS 내에탑재되어있는 ReaR를 많이 사용하고 계십니다. 대기업 부터 금융권에서 많이 사용하고있는걸
- 먼저 백업서버에 데이터를 저장할 NFS 를 구성하겠습니다.
1. NFS 서버 구성
2. Rear 패키지 설치
- Client 에서만 설치를 진행 합니다.
[root@rear-c ~]# dnf install rear genisoimage syslinux
Updating Subscription Management repositories.
Red Hat Enterprise Linux 8 for x86_64 - AppStream (RPMs) 30 MB/s | 59 MB 00:01
Red Hat Enterprise Linux 8 for x86_64 - BaseOS (RPMs) 32 MB/s | 65 MB 00:02
Package genisoimage-1.1.11-39.el8.x86_64 is already installed.
Dependencies resolved.
===================================================================================================================================================================================================
Package Architecture Version Repository Size
===================================================================================================================================================================================================
Installing:
rear x86_64 2.6-10.el8 rhel-8-for-x86_64-appstream-rpms 785 k
syslinux x86_64 6.04-6.el8 rhel-8-for-x86_64-baseos-rpms 578 k
Installing dependencies:
bind-export-libs x86_64 32:9.11.36-11.el8_9 rhel-8-for-x86_64-baseos-rpms 1.1 M
dhcp-client x86_64 12:4.3.6-49.el8 rhel-8-for-x86_64-baseos-rpms 318 k
dhcp-common noarch 12:4.3.6-49.el8 rhel-8-for-x86_64-baseos-rpms 207 k
dhcp-libs x86_64 12:4.3.6-49.el8 rhel-8-for-x86_64-baseos-rpms 148 k
ipcalc x86_64 0.2.4-4.el8 rhel-8-for-x86_64-baseos-rpms 38 k
libburn x86_64 1.4.8-3.el8 rhel-8-for-x86_64-appstream-rpms 173 k
libisoburn x86_64 1.4.8-4.el8 rhel-8-for-x86_64-appstream-rpms 410 k
libisofs x86_64 1.4.8-3.el8 rhel-8-for-x86_64-appstream-rpms 221 k
syslinux-nonlinux noarch 6.04-6.el8 rhel-8-for-x86_64-baseos-rpms 555 k
xorriso x86_64 1.4.8-4.el8 rhel-8-for-x86_64-appstream-rpms 281 k
Transaction Summary
===================================================================================================================================================================================================
Install 12 Packages
3. Rear 백업 설정 하기
[설명]
---------------------------------------------------------------------------------------------
OUTPUT
Define the bootable image type among USB, ISO, RAWDISK
OUTPUT_URL
Backup Target among NFS, CIFS, FILE, FTP, HTTP, RSYNC
BACKUP
Which backup method to use: External third-party or internal ReaR mechanism?
BACKUP_URL
Backup target location when using the internal backup method.
BACKUP_PROG_EXCLUDE
Directories to be excluded while performing the backup. Examples are /media and /var/tmp
---------------------------------------------------------------------------------------------
# vim /etc/rear/local.conf
OUTPUT=ISO
OUTPUT_URL=nfs://192.168.122.220/backup
BACKUP=NETFS
BACKUP_URL=nfs://192.168.122.220/backup
BACKUP_PROG_EXCLUDE=("${BACKUP_PROG_EXCLUDE[@]}" '/media' '/var/tmp' '/var/crash')
---------------옵션-------------------------------------------------------------------------
- 특정 폴더를 제외 옵션
BACKUP_PROG_EXCLUDE=( '/data/folder1/*' '/data/folder2/*' ) #여러 항목을 추가 가능
- 특정 F/S 제외 옵션
EXCLUDE_MOUNTPOINTS=( "/data01" "/data02" )
EXCLUDE_COMPONENTS=( "fs:/data01" "fs:/data02" )
EXCLUDE_RECREATE=( "fs:/data01" "fs:/data02" )
! 주의 : OS 부팅 시 에러 발생 => mkfs, mount 과정 통해 fs를 재생성또는 , /etc/fstab에서 해당 fs를 제거해야 정상 부팅
---------------------------------------------------------------------------------------------

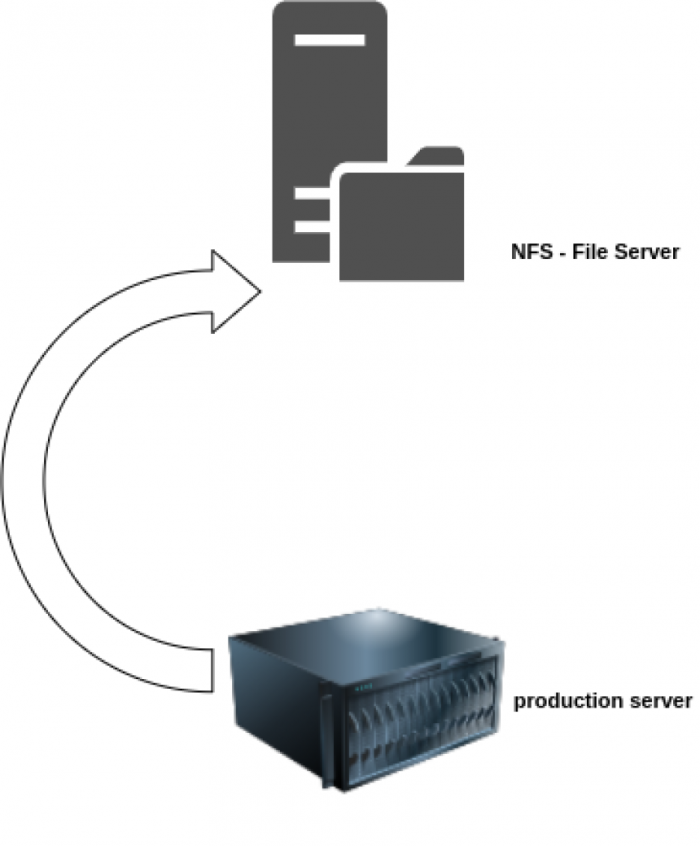
- 위 그림과 같이 Client 서버에서 백업서버로 데이터를 밀어 넣습니다.
4. 백업 실행
[root@rear-c ~]# rear -v -d mkbackup
Relax-and-Recover 2.6 / 2020-06-17
Running rear mkbackup (PID 37342)
Using log file: /var/log/rear/rear-rear-c.log
Running workflow mkbackup on the normal/original system
Using backup archive '/tmp/rear.DzOC2vlZyLW9egz/outputfs/rear-c/backup.tar.gz'
Using autodetected kernel '/boot/vmlinuz-4.18.0-372.9.1.el8.x86_64' as kernel in the recovery system
Creating disk layout
Using guessed bootloader 'GRUB' (found in first bytes on /dev/vda)
Verifying that the entries in /var/lib/rear/layout/disklayout.conf are correct ...
Creating recovery system root filesystem skeleton layout
Handling network interface 'enp1s0'
enp1s0 is a physical device
Handled network interface 'enp1s0'
To log into the recovery system via ssh set up /root/.ssh/authorized_keys or specify SSH_ROOT_PASSWORD
Copying logfile /var/log/rear/rear-rear-c.log into initramfs as '/tmp/rear-rear-c-partial-2024-01-31T13:09:00+09:00.log'
Copying files and directories <------------------NFS 서버에 데이터 저장 하기 시작
Copying binaries and libraries
Copying all kernel modules in /lib/modules/4.18.0-372.9.1.el8.x86_64 (MODULES contains 'all_modules')
Copying all files in /lib*/firmware/
Skip copying broken symlink '/etc/mtab' target '/proc/48589/mounts' on /proc/ /sys/ /dev/ or /run/
Ignoring irrelevant broken symlink /usr/lib/modules/4.18.0-372.9.1.el8.x86_64/build
Ignoring irrelevant broken symlink /usr/lib/modules/4.18.0-372.9.1.el8.x86_64/source
Testing that the recovery system in /tmp/rear.DzOC2vlZyLW9egz/rootfs contains a usable system
Creating recovery/rescue system initramfs/initrd initrd.cgz with gzip default compression
Created initrd.cgz with gzip default compression (498567622 bytes) in 29 seconds
Making ISO image
Wrote ISO image: /var/lib/rear/output/rear-rear-c.iso (488M)
Copying resulting files to nfs location
Saving /var/log/rear/rear-rear-c.log as rear-rear-c.log to nfs location
Copying result files '/var/lib/rear/output/rear-rear-c.iso /tmp/rear.DzOC2vlZyLW9egz/tmp/VERSION /tmp/rear.DzOC2vlZyLW9egz/tmp/README /tmp/rear.DzOC2vlZyLW9egz/tmp/rear-rear-c.log' to /tmp/rear.DzOC2vlZyLW9egz/outputfs/rear-c at nfs location
Making backup (using backup method NETFS)
Creating tar archive '/tmp/rear.DzOC2vlZyLW9egz/outputfs/rear-c/backup.tar.gz'
Archived 2442 MiB [avg 14208 KiB/sec] OK
WARNING: tar ended with return code 1 and below output:
---snip---
tar: /var/lib/sss/pipes/private/sbus-monitor: socket ignored
tar: /var/lib/sss/pipes/private/sbus-dp_implicit_files.1000: socket ignored
tar: /var/lib/sss/pipes/nss: socket ignored
----------
This means that files have been modified during the archiving
process. As a result the backup may not be completely consistent
or may not be a perfect copy of the system. Relax-and-Recover
will continue, however it is highly advisable to verify the
backup in order to be sure to safely recover this system.
Archived 2442 MiB in 177 seconds [avg 14127 KiB/sec] <------- 전송 결과
Exiting rear mkbackup (PID 37342) and its descendant processes ...
Running exit tasks
You should also rm -Rf --one-file-system /tmp/rear.DzOC2vlZyLW9egz
- 데이터 이전시 rear-c 서버에서 보면 NFS가 연결되어 파일을 넘기고 있는것을 확인 할수있다.
[root@rear-c tmp]# df -hP
Filesystem Size Used Avail Use% Mounted on
devtmpfs 3.9G 0 3.9G 0% /dev
tmpfs 3.9G 0 3.9G 0% /dev/shm
tmpfs 3.9G 9.2M 3.9G 1% /run
tmpfs 3.9G 0 3.9G 0% /sys/fs/cgroup
/dev/mapper/rhel-root 17G 8.3G 8.8G 49% /
/dev/vda1 1014M 228M 787M 23% /boot
tmpfs 796M 12K 796M 1% /run/user/42
tmpfs 796M 0 796M 0% /run/user/0
192.168.122.220:/backup 40G 2.8G 38G 7% /tmp/rear.DzOC2vlZyLW9egz/outputfs <---NFS을 자동 마운트 하여 데이터 전송중
5. 백업 확인
- 백업이 완료되면 호스트네임기준으로 폴더가 생기고, 그 밑에 백업데이터들이 쌓이게 됩니다.
[root@rear-s rear-c]# pwd
/backup/rear-c
[root@rear-s rear-c]# ls -al
total 3035948
drwxr-x--- 2 root root 120 Jan 31 13:12 .
drwxr-xr-x 3 root root 20 Jan 31 13:09 ..
-rw------- 1 root root 11433531 Jan 31 13:12 backup.log
-rw------- 1 root root 2585786056 Jan 31 13:12 backup.tar.gz
-rw------- 1 root root 202 Jan 31 13:09 README
-rw------- 1 root root 511428608 Jan 31 13:09 rear-rear-c.iso
-rw------- 1 root root 143810 Jan 31 13:09 rear-rear-c.log
-rw------- 1 root root 270 Jan 31 13:09 VERSION
- 백업할 서버의 호스트 이름은 원격 대상 위치에 생성된 ISO 파일에 접두사가 붙습니다.
. rear-production.iso - 부트 ISO 이미지, 복구 중 사용
. backup.tar.gz - 프로덕션 서버의 파일을 포함하는 TAR 파일
. ReaR 명령은 mkbackup 작업 중에 생성된 디렉토리를 제거하라는 제안과 함께 끝납니다.
6. 백업 복구
TEST 1>
> 일부 데이터를 삭제 해보겠습니다.
[root@rear-c ~]# pwd
/root
[root@rear-c ~]# ls
anaconda-ks.cfg Desktop Documents Downloads initial-setup-ks.cfg Music Pictures Public Templates Videos
[root@rear-c ~]# rm -rf Music/ Pictures/ Public/ Templates/
[root@rear-c ~]# ls
anaconda-ks.cfg Desktop Documents Downloads initial-setup-ks.cfg Videos
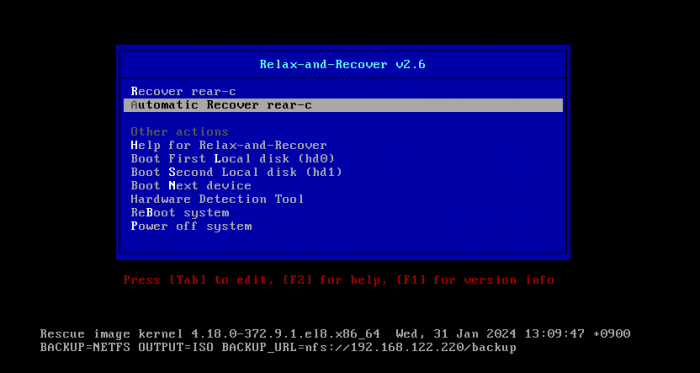
- 위에서 생성 된 rear-rear-c.iso 이미지로 부팅을 시도하면 아래와 같이 화면이 나옵니다.
-rw------- 1 root root 511428608 Jan 31 13:09 rear-rear-c.iso
. 여기서 2번째 줄 Automatic 으로 선택하여 복구를 시도했습니다.

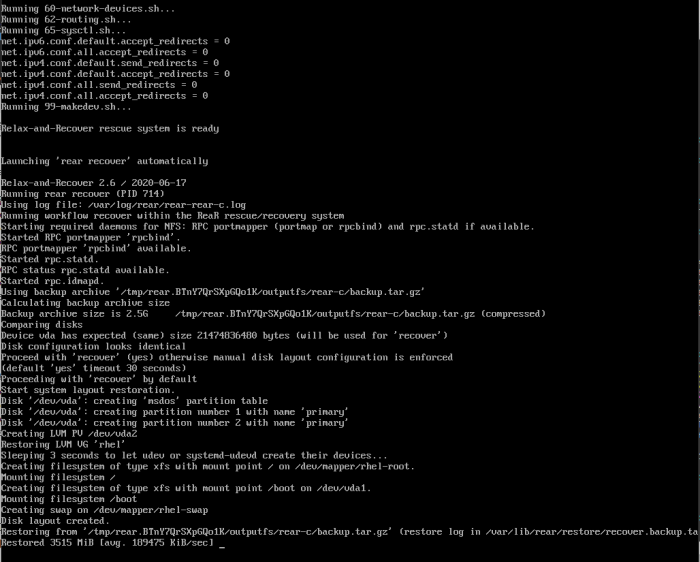
위 이미지와 같이 데이터를 가져와 복구를 시도하고있습니다.
- 복구가 완료된 후 리부팅을 한후 아까 지운 폴더들이 생성된것을 확인 할수있습니다.
> 복구 완료후 삭제된 폴더가 복구된것을 확인 할수있습니다. Music/ Pictures/ Public/ Templates/
[root@rear-c ~]# pwd
/root
[root@rear-c ~]# ls
anaconda-ks.cfg Desktop Documents Downloads initial-setup-ks.cfg Music Pictures Public rear-2024-01-31T16:29:10+09:00.log Templates Videos
TEST2>
- TEST1와 같이 방법으로 진행하였고, /usr 폴더를 지우고 복구하였습니다.
> /usr 삭제
[root@rear-c tmp]# cd /usr/
[root@rear-c usr]# ls
bin config games include lib lib64 libexec local sbin share src tmp
[root@rear-c usr]# rm -rf *
[root@rear-c usr]# ls
-bash: /usr/bin/ls: No such file or directory <------ /usr를 통째로 지워서 명령어가 안되는 현상
- TEST1 과 같이 동일하게 복구 하니 정상적으로 OS 부팅 후 /usr이 복구된것을 확인할수있었습니다.
> /usr 복구 확인
[root@rear-c ~]# cd /usr/
[root@rear-c usr]# ls
bin config games include lib lib64 libexec local sbin share src tmp
테스트 결과, 속도도 빠르고, 설치 및 설정 또한 매우 간편했습니다. 하지만 ISO로 이미지 부팅을 해야하는것이 좀
개인적으로 불편했습니다. 좀 더 테스트 해서 리부팅 하지 않고, 변경된 데이터만 복구 할수있는지 테스트를 진행해보겠습니다.
추가적으로 좀 설명 더 드리자면, 날짜별로 백업을 하고 싶다면, crontab을 이용하여 예약 백업을 하시면 됩니다. ^^
감사합니다.
참고링크 :


 Top
Top